Written by Grant Erwin
Updated 01/20/05
To email me feedback on this page, click here
These days I see a lot of 5-gallon propane tanks available for free. They have always been plentiful but with the new OPD valve requirements they are now a glut on the market. I have rarely had to pay for a used tank. However, handling them is scary -- after all, they are filled with a very flammable gas, and the valve in them seems to have been put on by two gorillas on steroids! I have researched the safety issues and figured out a procedure for preparing these tanks for reuse which hasn't killed me yet. This document shows how I do it.
DISCLAIMER -- Just because I didn't kill myself does NOT mean you won't. Although I believe my procedures to be safe and have done them myself multiple times, my research may have led me to incorrectly conclude my procedure is safe and I may have just been lucky. If you follow this procedure you should be fully aware that you alone are responsible for your own safety. In the end, common sense prevails.
If you want to repeat my research, google "groups" using the following: "Bob Engelhardt" "Experiments with empty propane tanks"
You may have luck with this: Archived Thread
Bob's conclusion was that if you first drain a propane tank (bleed off all gas, then turn upside down with the valve wide open, perhaps overnight) and then pressurize the tank to 100 psi and release the air/propane mix and then repeat the pressurize/empty step that after that the propane is too dilute to burn. I didn't repeat his experiments, but I did use his air flushing technique and sure enough nothing bad happened the times I did it.
Propane Bottle Valve Removal Steps
This procedure assumes the bottle's welded on sheet metal ears will all be removed anyway as part of reclaiming the bottle for other use.
Step 1: Use the propane in the tank however you can until the tank feels empty. Then position the tank on top of a large hill. Install a propane fitting so the valve will pass fuel gas. There are two types of tank valves in common use. One requires a POL connector and the other requires a quick-connect fitting. See: JPG Image
Crack the valve and let it bleed until it stops hissing and no gas can be felt escaping with your fingers.
Step 2: (cold weather) Bring tank inside and let warm up. If it's warm out (above 50° or so) skip this step.
Step 3: With the valve fully open and the fitting installed, turn the tank upside down, again at the top of a large hill. Let it vent fully.
Step 4: Plumb an air hose to a propane fitting such that you can pump air into the tank. There are two types of tank valves out there. One requires a POL connector and the other requires a quick-connect fitting. See: JPG Image
The propane fittings are available at many hardware stores and the air connector is just one of the industrial type quick-connects with a female 1/4" NPT. I didn't bother using thread sealant on these because I don't care if they leak and in fact I disassemble them after every use.
Step 5: Connect the air hose to an air compressor and fully pump up the tank to at least 100 psi (remember to open the valve fully when doing this). See: JPG Image
Step 6: Disconnect the air hose and take the tank back to the top of the large hill and crack the valve and let the air fully bleed out. (Note: I had the misfortune to try this with a tank which had a quick-disconnect valve on it, which was mostly plugged. I made this step go a lot quicker by also cracking open the bleed screw on the side of the propane valve.)
Step 7: Repeat steps 5 and 6 at least one more time, preferably more. This dilutes the propane remaining in the tank. There is still propane in the tank after the air dilution steps, but now it can not burn because there isn't enough propane to make a mixture that will burn in air.
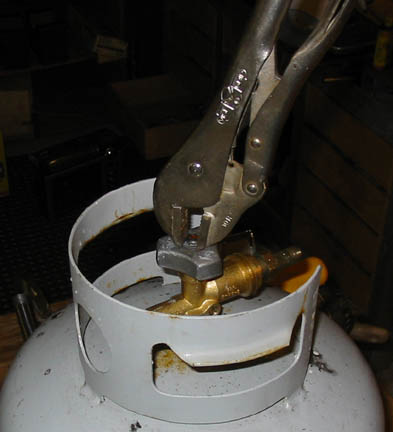
Step 8: Remove the valve handle. On the quick-connect valve, the handle had some kind of security screw for which I had a bit. Feeling smug, I whipped it out. On the OPD valve, it had a newer security screw, a real nasty one with 5 lobes. I didn't have a bit for it, so I cheated and used a pair of brand name Vise-Grips, which worked just dandy: JPG Image
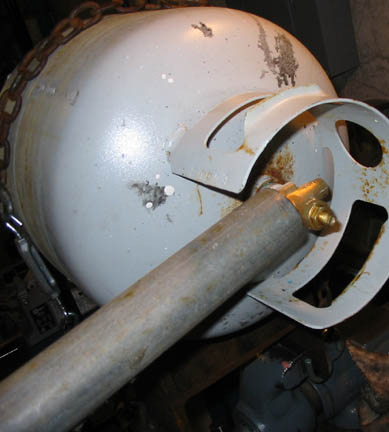
Step 9: Put a large short piece of steel I-beam into a vise so it looks like a capital 'H' i.e. opening up. (Note, in this configuration looking at it from the side the piece of I-beam looks like a U pointing up and another one pointing down.) Lay the tank across the top of the I-beam, and hook a piece of chain with a turnbuckle over the tank, catching the bottoms of the I-beam with large S-hooks. Tighten the turnbuckle so as to clamp the tank rigidly to the I-beam, which when clamped rigidly in the vise will be as rigid a setup as the bench the vise is on. I didn't actually use much force on the turnbuckle, just hand-tight plus maybe 1/4 turn with a wrench. Here is my piece of I-beam in my bench vise: JPG Image
Here is a tank, clamped, with a 1-1/8" wrench over the valve. JPG Image
Step 10: Using a handheld propane torch, heat the threaded area. The threads holding on the tank valve are right-hand threads, but the valve is locked in using a strong threadlocker. The heat will release the threadlocker. When the paint starts to smoke, use a large wrench to remove the valve. It's a little scary to get near the business end of a fuel tank valve with an open flame! I shot a picture of me heating with one hand while holding the camera with the other hand. It's a little fuzzy but you'll get the idea: JPG Image
Sometimes a wrench doesn't quite "get it". I stuck a big pipe over the valve and, with heat, that "got it"! JPG Image
Step 11: Propane is "odorized" with methyl mercaptan, a very perceptible (odor threshold is in the range 0.1 to 1.0 parts per billion) "skunk-like" odor. Some say it strongly smells of garlic. The chemical makeup of ethyl mercaptan is CH3- SH. This can be quickly and easily transformed to CH3-SO3 by rinsing in a 5% sodium hypochlorite solution (common household bleach) after which it can be rinsed away with hot water. To do this, pour 1-2 cups of bleach into the threaded tank opening, plug it with a 3/4" NPT pipe plug or equivalent, pick up the tank and slosh it around thoroughly, then fill the tank with hot water and drain. The dissolved mercaptan will turn the water orange. It isn't rust, don't worry. Repeat the hot water rinse, then turn the tank upside down and let it air dry while draining.